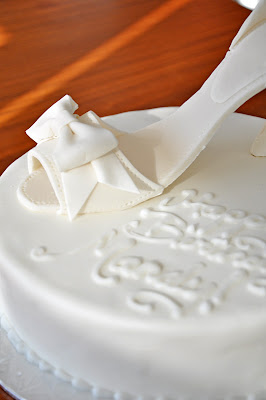
First ever high-heel cake!
There's a whole load of tutorials already out there on the web on how to make a gumpaste high heel. However, to prove the point that the internet has too much space (and to use said space to its fullest extent), I'll run over how I did the one you see here.
Step 1: find out how high heels actually look like, since I can't really speak from experience. (Thank you Google Image search). I chose an open-toe design because forming a "toe" would require more bending/molding of gumpaste (i.e. be more difficult).
Step 2: form a base that will shape the bottom sole of the shoe. For me, I used a pie box, folded, stapled, and gently curved.

Step 3: do a paper mock-up. This really helps to make sure it will end up the right size/shape. I did a bit of trimming here and there, and the heel was redesigned to make it more streamlined.
Step 4: use the paper templates to cut out your gumpaste. I tried using a pizza cutter, but it didn't manoeuver as well as I hoped. I ended up sharpening a paring knife to be extra sharp and then carefully traced around the paper template. (Just be careful - the knife can sometimes pull at the gumpaste and distort things).
Step 5: add stitching details around the edge of each piece. I don't have a special rolling tool for this, so I just used a fork and gently pressed the tongs into the gumpaste about 2-3mm from the edge, all the way around.
Step 6: lay out the sole over the template. (Wax or parchment paper helps the sole from sticking and keeps it clean. Just make sure to tape the paper in place so it doesn't slide out). Notice the pack of crackers to keep the curve in the right place.
 Step 7: add the toe and the heel to the outer sides of the sole. To make sure they were properly attached, I scored the surface with a knife - like you would with clay. I used gumpaste scraps dissolved in water to make a sort of gel-type glue. (A little goes a long way, so don't get things too wet). A wad of cling-wrap was used as a spacer for the toe. The heel stood up on its own.
Step 8: Let dry. Let dry. Let dry. (I left this overnight).
Step 9: decorate! I was originally going to use a flower to accent the toe, but instead decided on a bow. (There are plenty of tutorials on how to make a gumpaste bow online, and I don't have any photos to show, so I'll skip this part). Attach the bow to the toe with some more gumpaste glue.
Step 10: make the heel. Make a ball of gumpaste, and roll into a sort of egg-shape. Press one side flat against the work surface. I used a sharpened wooden dowel as the core of the actual heel, which I stuck into the round part of the "egg." The dowel was then wrapped in gumpaste, which was then blended into the "egg" to form the entire heel.
Step 11: Let dry some more (Again, the heel and the shoe were left overnight to dry).
Step 12: Attach the heel to the shoe. Because the heel was partially dry at this time, and the sole/heel didn't match up perfectly, I used royal icing to attach the two. I left everything upside down to dry... which was a bad idea, since the shoe (predictably) broke in half.

Step 12B (What I should have done): What people typically use is a styrofoam block (or cake dummy) to hold everything in place as they dry. Since I had none at hand, I used an egg carton. I skewered the heel in place, used some royal icing to join the broken piece, and added a heel pad to cover and reinforce the joint (again, using the gumpaste glue).
Step 13: Let dry. (Again, overnight)

Step 14: Sometime during all of this, make a cake to put the shoe on! I chose to do a three-layer green tea cake with lemon Swiss-meringue buttercream. I covered the outside with marshmallow fondant. This was also my first time covering a cake without freezing it first, which worked out really well. I could smooth out the bumps in the fondant a lot better. A little bit of royal icing bead piping at the base and an appropriate birthday message, and then I was done.
Step 15: assemble the cake. All that was left was to stick the heel into the cake.

Step 16: surprise someone with a high-heel cake!


 You can see the layers of the cake in the photo. Unfortunately, I didn't get any better photos of a slice.
I'd like to point out that the fondant on the cake was actually not that thick as it seems in the photo - the white layer on the outside is both the buttercream and the fondant, the latter of which was only about 1/8" thick. Thin fondant is harder to work with, but I definitely try because 1/4" of fondant is a bit much for anyone to stomach.

No comments:
Post a Comment